Register sections
Purpose

|
Use tools available when you click Register Sections to register images of individual serial sections or 3D reconstructions, created using the Serial Section Assembler workflow, to a reference-brain atlas. These tools are designed to register (or align) images in which each image plane in the file was acquired independently, typically from sections on a slide. |
Use Register volume rather than Register Sections if you're working with 3D images obtained from cleared tissue, blockface images, or any tissue that was imaged whole.
See also Registration windows and tools reference for an overview of the "registration mode" software interface and tools that are available when registering either serial sections or image volumes acquired from unsectioned tissues.

Before you start
-
Mouse brain atlases are installed when NeuroInfo software is installed. If you are working with images from animals other than mice, our download center may have an atlas for your species. Alternatively, brain atlases can be configured for use in NeuroInfo.
Click here for instructions on installing brain atlases from our download center and configuring atlases for use in NeuroInfo.
-
Open an image of a single section or an image stack of a 3D brain reconstruction (e.g., the output from the Serial Section Assembler workflow) using any of the following methods.
-
Drag and drop the file onto the NeuroInfo software window.
-
 Click Open an image file button in the Quick Access bar or type Ctrl+O.
 -
 Go to File > Open > Image Stack.
 If your brain image is not visible or is almost offscreen, go to the Image ribbon and click Fit to Screen.
The image file format we recommend for use in NeuroInfo is .jpx, however, in many cases, proprietary microscope-system files can be used (e.g., .nd2, .lif, .czi, .vsi).
If you encounter any problems with using your image files in NeuroInfo, we recommend that you convert the files to .jpx using our free MicroFile+ software designed to help researchers manage large quantities and types of microscopy image data.
-
-
 Using the Image Adjustment tool (available on the Workspace ribbon), we recommend making the following adjustments:
-
Display only the color channel(s) with the anatomic information that you want to use for alignment. Deselect the other color channels so that they are not displayed.
-
Choose a light color, such as white, yellow, or pale orange to display the selected color channel(s).
-
Adjust the histogram so that structures in the image are clearly visible.
Note that these display adjustments do not impact registration results, but they can help you to visually evaluate and manually adjust registration. Registration utilizes raw image data at its acquired intensity bit-depth for more accurate results.
-
Procedure
A. Enter section registration mode and navigate to a section near the center of the brain
-
 Click Register Sections in the NeuroInfo tools section of the Registration ribbon.
 -
The Register Section to Atlas window opens on the right; this is where you'll do most of the work.
-
The Registration ribbon displays functions relevant for registering sections to the atlas.
 Other tools are displayed once you click Leave Registration.
-
-
If you are working with a 3D brain reconstruction image: use the 3D Slice Scroll slider or the Orthoview tool to navigate to a section in the experimental brain with good contrast and distinguishable features, such as the hippocampus and fiber tracts. If you're working with a whole brain reconstruction from a specimen that was sectioned in the coronal orientation, typically a section near the center of the brain is ideal. If you are working with a partial brain, a single lobe of the brain, or a brain that was sectioned along the transverse or sagittal plane, go to a location near the center of one of the brain lobes.
B. Activate, create, or confirm your Current calibration
Context
Calibration provides NeuroInfo with enough information about how your brain image(s) relates to the reference-brain atlas to enable the effective use of automatic registration (alignment) tools. It establishes:
-
the brain atlas you are using as the reference
-
the anatomic orientation of the experimental image data
-
approximate relative scaling of the brain specimen(s) to the atlas
There is a setting in Registration preferences, Use the global calibration file that determines whether NeuroInfo software shares calibration files among all users (box is checked) or only displays/edits the calibration files associated with the current User profile (box is unchecked). This setting can help multiple users share calibration settings for experimental specimens produced using the same methodology or can help prevent inadvertent changes to calibration settings configured by another researcher.
To set the calibration:
-
Expand the Current calibration: section at the top of the Register section to atlas panel.
Click any calibration in the table to display information about its associated atlas.
-
Then do one of the following:
-
Verify that the appropriate calibration is activated; this is indicated by a green check mark in the Active column of the table.
Information about the atlas associated with the active calibration is displayed below the table.
-
a calibration that was created previously.
-
Click the calibration in the table that you want to use; information about the atlas associated with the calibration is displayed below the table; you may want to review it.
-
Click Activate to use the selected calibration for registration.
Confirm that there is a green check mark for the calibration in the Active column.
You can open a data file that was registered to a brain atlas previously and activate a calibration associated with a different atlas to update the transforms for that registration to the active calibration. In other words, you can use this function to change the atlas associated with you previously registered image. This may be useful for comparing results with online atlas databases or with results from other laboratories using the same reference atlas.
-
-
Create a new calibration by clicking (see instructions below).
You will need to create a new calibration in the following circumstances:
-
The first time you use NeuroInfo
-
For images of brains sourced, processed and/or imaged differently than those represented in the list of calibrations
-
To modify the transforms from a previous registration to use an updated or different reference-brain atlas.
For example, if you registered an experimental sample using the AllenCCF Default calibration that is based on the Mouse Allen/MBF CCFv3 25um atlas (formerly called Allen2017Coronal_25um), you may want to change the reference brain atlas to the unmodified, sagittal orientation Mouse Allen CCFv3 25um (or 10um) atlas to use the data and tools available through the Allen Institute or to compare with data that was generated by registration with the Allen Mouse Brain CCFv3.
-
-
an existing calibration by selecting it and clicking Edit (see instructions below). You may want to edit a calibration for the following reasons:
-
To refine the calibration to include the transforms created by registering the experimental image to the atlas. In other words, you can update the calibration after completing the registration so that it may be more useful for registering images of other brains that were sourced, processed, and imaged similarly.
-
To reflect different processing or imaging protocols, or to test alternate calibration settings.
-
-
-
If you are working with a 3D brain reconstruction image: If you haven't already done so, use the 3D Slice Scroll slider or the Orthoview tool to navigate to a section in the experimental brain with good contrast and distinguishable features, such as the hippocampus and fiber tracts. If you're working with a whole brain reconstruction from a specimen that was sectioned in the coronal orientation, typically a section near the center of the brain is ideal. If you are working with a partial brain, a single lobe of the brain, or a brain that was sectioned along the transverse or sagittal plane, go to a location near the center of one of the brain lobes.
-
Register the section to the atlas using Single Sections tools:
-
Expand the Registration section of the Register Sections to Atlas panel and
 click Single Sections.
 -
 Click Adjust and use the manual tools to do the following:
-
Use the Scale (size) sliders to make the atlas size more closely match the size of the experimental brain section.
-
Adjust the Shift sliders to align the atlas to the experimental brain section; this is particularly important when working with a single brain lobe or other partial-brain image.
-
-
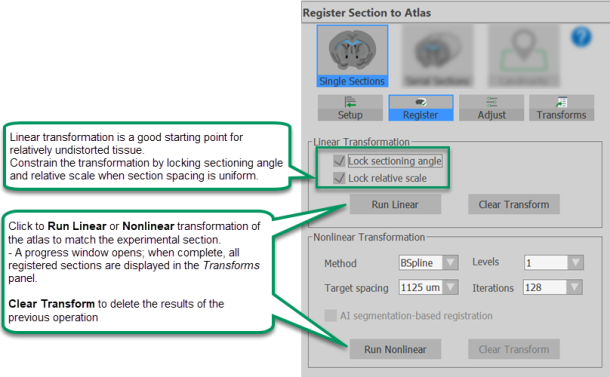
 Click Register and use Linear Transformation to refine the registration and identify the rotation needed to register the experimental image to the atlas.
 -
If needed, you can repeat these steps to further refine the registration.
-
-
Save the calibration when you are satisfied with this initial alignment/registration; click Save in the Calibrations section at the top of the panel.
Once saved, the calibration will be selected by default the next time that you open NeuroInfo; it can be used with other specimens from the same species that were prepared using the same tissue processing procedures.
C. Create reference section(s)
It's a good idea to double-check that the calibration you want to use is activated; look for the green check mark in the Calibrations table and for the name of the calibration displayed in the Current Calibration: dropdown heading.
Context
A key section of the experimental image that has been interactively registered to a brain atlas. Reference sections typically have prominent anatomic features that make them suitable for interactive review to ensure accuracy. Reference sections are used in serial section registration to initialize the registration of other sections in the brain.
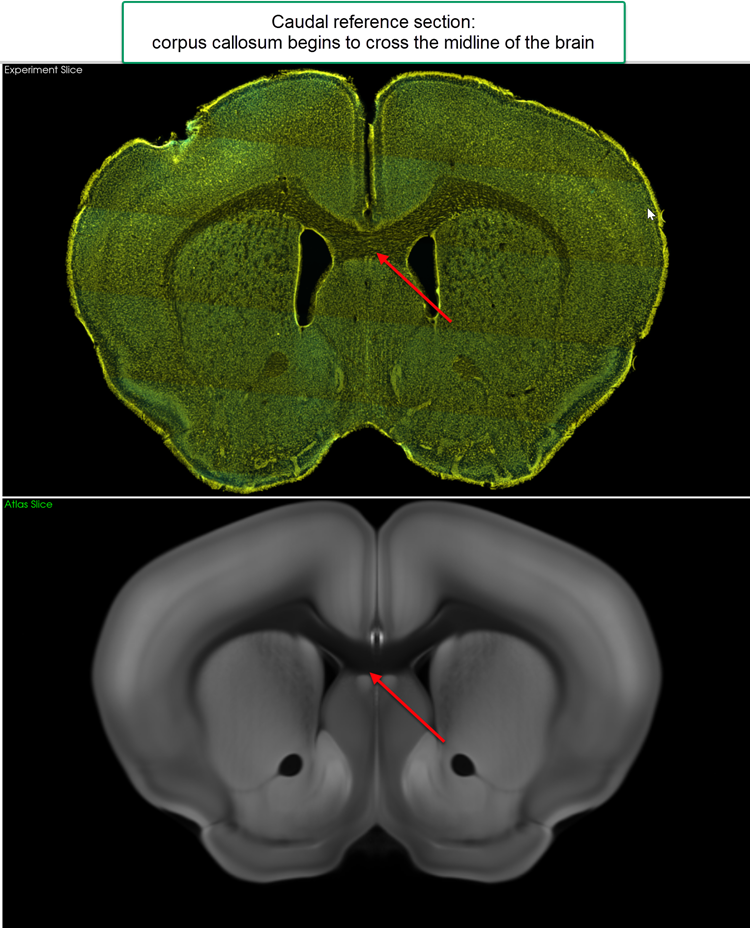
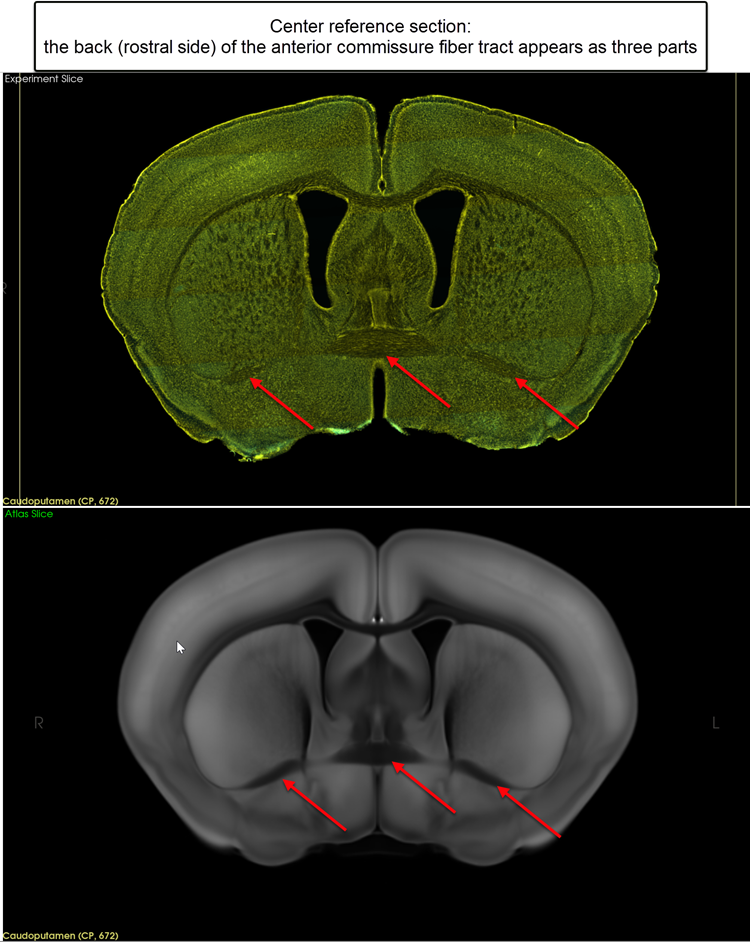
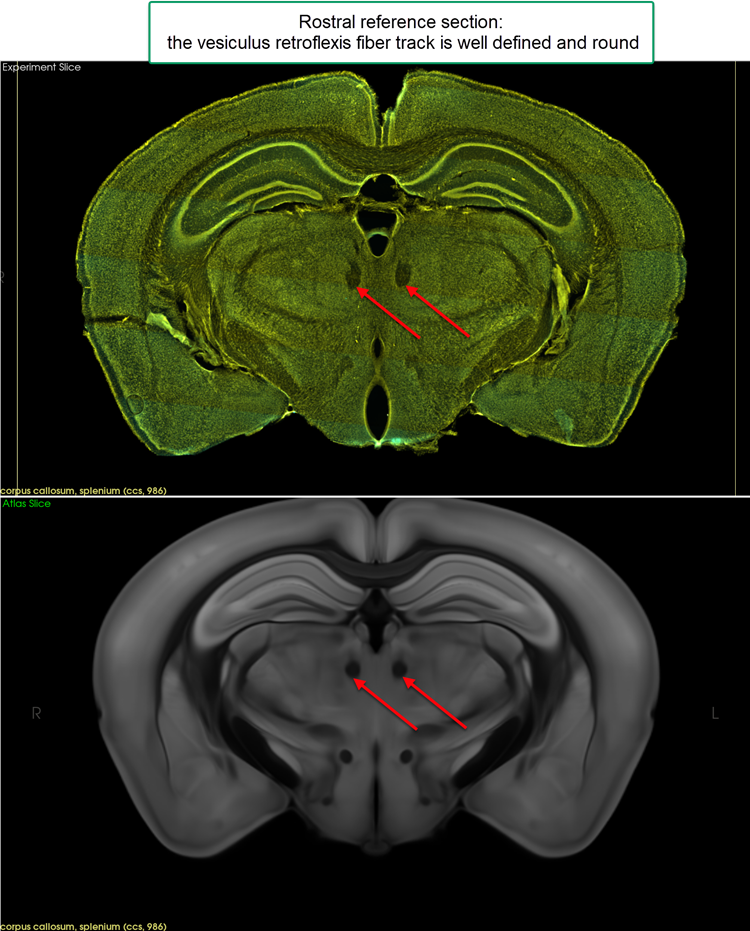
We routinely create reference sections at the following anatomic feature locations in coronally sectioned brain (click thumbnail images to expand to full size):
-
Rostral: the corpus callosum begins to cross the midline of the brain
-
Center: the back (rostral side) of the anterior commissure fiber tract appears as three parts
-
Caudal: the first section in which the fasciculus retroflexus fiber track is round
Creating reference sections
-
In the Experiment Slice panel (top right), navigate to the section you want as a reference section in the experimental brain image using use the 3D Slice Scroll slider or the Orthoview tool. Take note of the section number displayed at the top of the 3D Slice Scroll panel.
You may want to turn the atlas overlay off as you navigate to the reference section; uncheck the Show atlas over experiment slice box or adjust the slider in the Visualization Options section of the panel.
-
Expand the Registration section of the Register Sections to Atlas panel and
Click Single Sections. -
 Use the Setup, Register, and/or Adjust tools to register the section to the atlas. These tools are described in the table below.
-
(optional, but recommended) Regardless of the method used initially, you can refine the registration of the experimental section to the atlas; click .
-
If needed, you can repeat any of these steps to further refine the registration.
-
-
 Click Transforms to view each registered section in the data file associated with the current image volume. Designate some or all of the registered sections as Reference sections by checking the box in the Ref column of the table.
D. Register the other sections of interest (or the entire 3D brain reconstruction)
Context

|
Once you have well-registered reference sections, use the automatic tools to register the other sections that interest you, up to and including the entire brain volume.
|
Procedure for using Atlas Constrained transformation to register multiple sections at once
-
 Click Serial Sections in the Registration section of the panel, then
  Click Atlas Constrained. Atlas-constrained registration refines the assembly of the serial section images into a more cohesive brain volume, then registers to the reference brain atlas.
 -
 Click First Pass to set up and run registration of the center of the brain as follows:
-
Choose a Reference section at or near the center of the brain from the drop-down menu.
If reference sections have not already been registered, click Add Section to create a reference section; the Setup tool in Single Sections will open.
-
Choose two Support sections that flank the center of the brain.
NeuroInfo autofills the region to register (Apply changes fields) that include the support sections and the area between them. You can change this if desired, but this first pass should include only the center of the entire brain.
-
Click Run Linear to register the selected range of sections to the atlas. A progress window will display the registration operations.
When complete, you can view a list of the sections that were registered by clicking Transforms.
-
-
 Click Second Pass to set up and run the registration of the entire brain or all of the sections of interest.
 The procedure is largely the same as for the First Pass registration, except that just one reference section is selected; the default is to use the same reference section as for the first pass registration.
-
Enter the section range that you want to register in the Sections N to N fields or click to register all sections.
-
Click Run Linear to register the selected range of sections to the atlas. A progress window will display the registration operations. When complete, the sections that were registered are listed in Transforms.
-
-
(optional) Click Map to Intermediate to create a brain image volume registration that can be further refined for better precision using the Register Volume tools.
When complete, a message box will appear onscreen reporting that the mapping is complete, the number of image planes mapped, and the filename and location of the data file.
Procedure for using Independent transformation tools to register multiple sections at once
-
Click Serial Sections in the Registration section of the panel, then Click Independent.
-
Choose the sections to register and the reference section for the transformations:
-
Reference section: Select a section that has already been registered from the dropdown menu; it will be referenced for both Linear and Nonlinear registration refinement of additional sections.
If a reference section has not already been registered, click Add Section to create a reference section; the Setup tool in Single Sections will open.
-
Section: Type in the range of sections to register or
Click All to include all sections.
-
Overwrite existing transforms: Check to overwrite any existing section registrations when you run the registration.
-
-
Run Linear and/or Nonlinear transformation of the selected sections:
-
or Click Run Linear or Run Nonlinear to register the selected range of sections to the atlas.
-
Click Clear Transforms to clear the registration results.
-
We recommend that you run Linear transformation first, evaluate the precision of the alignment for each section individually, then repeat the Linear registration or run Nonlinear transformation and re-evaluate the alignment.
-
Repeat the registration of each section multiple times if desired; this will update and potentially further improve the registration result.
Linear Transformation options
-
Lock sectioning angle: Check to hold the sectioning angle constant using the angle identified for the reference section.
We recommend using this constraint in most cases; the sectioning angle identified near the center of the brain, where there is good contrast and multiple distinguishable features is typically more accurate than sectioning angles identified in parts of the brain with less contrast and more homogeneous anatomies.
-
Lock relative scale: Check to use the relative scale (compared to the atlas) identified for the reference section and keep the registration scale parameter constant while running a linear registration.
Nonlinear Transformation options
Nonlinear transformation optimizes a transform that is defined by a grid of parameters that are spatially aligned to the experimental image.
You can run nonlinear registration multiple times with different settings, and the method will start from the previous result. So, for example, you could do your own multiple resolution registration by running one level at a series of decreasing target spacings.
-
Method: With the BSpline method, the transform is described by displacement of control points with smooth interpolation between control points provided by BSpline basis function interpolation.
-
Target spacing: Controls the resolution of the final level of the registration. Finer resolutions could potentially improve accuracy at the cost of increased memory, storage, and computation time. For a 25 µm voxel spacing image, 100 µm target spacing is typically a good balance of good results and computer resources.
-
Levels: Controls how many levels of resolution to use during registration. More levels can be helpful to handle larger scale distortion; fewer levels can be used to refine already accurate registrations. We typically recommend using 3 levels the first time that you run Nonlinear registration, then 1 or 2 levels for subsequent runs.
-
Iterations: Controls the number of optimization iterations to run at each level of resolution; we recommend 128 iterations as a starting point in many cases. Note that a higher number of iterations will require more time and resources than a lower number.
-
E. Save your work
-
 Save the data file by clicking Save in the quick access menu, typing Ctrl+S, or by going to File > Save > Data file.
 -
 >
>  Save your transform set by clicking Registration transforms on the Registration ribbon, then Save transform set from the drop-down menu. The transform set includes atlas-transformation information for each section that was registered.
F. Identifying anatomical structures
Once you have registered (aligned) one or more sections to a reference atlas, you can accurately identify atlas structures in your experimental image(s) as follows:
-
See the name of the anatomical structure at the cursor location: Hover your mouse over the Experimental or Atlas Slice images (top and bottom images on the right) to display the name of the brain structure in the lower left corner of the image panel.
-
Display the outline of the anatomical feature:
-
Ctrl + click the location with your mouse
-
 Click Select Anatomy in the Registration ribbon and click the location with your mouse.
  Click Deselect Anatomy to turn off display of anatomical structures.
 -
 Click the check box for the structure name in the list displayed on the Atlas Ontology tab to display its outline. Uncheck the box to stop its display.
-
Learn more about identifying anatomical structures and using the Atlas Ontology tools.
Learn about Mapping experiments to/from the atlas
Section Registration tools reference
Following are descriptions of the tools available for registering sections to a brain atlas.
 These tools are in the Registration menu in the Register Section to Atlas panel.
They are organized in the tables below as they appear in NeuroInfo, which represents the generally recommended order for use. Note, however, that these tools are flexible and can be used in different sequences, depending on the experiment and user preference/experience.
See also:


|
This is a good place to start the registration process. Single Sections: Tools for registering individual serial sections to the reference-brain atlas. |
|
|
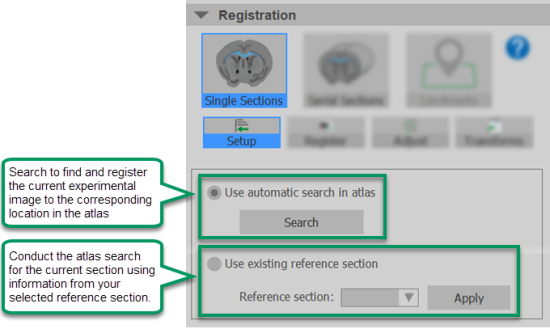
Setup: Tools for initializing registration of the current section by searching the entire atlas or using a previously registered section to inform the atlas search/registration process. |
-
Use automatic search in atlas: Choose this option to establish the atlas location, sectioning angle, and scale relative to the atlas for the current image plane when no other sections have been registered or when you want NeuroInfo to register the section independently, that is, without considering the registration of other sections in the image volume.
Click Search to start the search. A progress window opens while the search runs and closes when it is complete. The resulting transform will be displayed in the Transforms panel.
-
Use existing reference section: Choose this option to find the current image plane in the brain atlas using select registration parameters from a previously registered reference section.
Select the Reference section from the drop-down menu; and click Apply to start the search
|
|
Register: Tools for refining the registration of the current section. |
Nonlinear transformation: Applies a transform that is non-uniform across the section. Nonlinear transformation can improve the registration of a section in some cases; we recommend trying it if the results of linear transformation do not meet your expectations.
-
Use the sliders to Shift, and adjust Rotation and Scale to transform the atlas slice so that it matches the experimental slice image. The sliders are labeled as follows:
-
D and V: dorsal and ventral
-
R and C: rostral and caudal
-
L and R: left and right
-
-
: Click to clear the atlas transform
-
Note that one of the Shift sliders (which one depends on the specimen orientation) changes the brain-atlas plane (section) displayed. Use it to display the section of the atlas brain that most closely matches the experimental section displayed.
-
It's helpful to turn the atlas overlay on and off as you align the images. Do this by toggling the checkbox and/or adjusting the slider to Show atlas over experiment slice in the Visualization Options section of the panel.
-
Moving any of the sliders creates a transform. To finalize a transform, move to a different experimental section and the adjustments made to the previous section is stored as a transform.
|
|
Transforms: View and manage a list of transforms created by registering sections. |
Use the Transforms controls to designate transforms as reference sections for registration of other sections, quickly jump to a section in the Experiment Slice pane of the display, and delete transforms that you want to remove from your results.
![]()
|
|
Serial Sections: Tools for registering all or some serial sections to the brain atlas in a single operation after you have created reference sections using the Single Sections tools. |
|
|
Atlas constrained: We recommend using this method to register your experimental images to the atlas. Each section is registered to the atlas using a transform with some independent parameters and some shared parameters. You must have already created appropriate reference sections to use this tool. |
The First Pass registration establishes registration parameters based on the anatomic-feature rich core of the brain that will be used in the Second Pass to assist with registration of the non-core areas of the brain that, in general, have a more homogeneous appearance.

|
Run the First Pass on the center of the brain, i.e., for a coronally oriented brain, register the are that lies between the rostral and caudal reference sections described for creating reference sections. |

|
Next, run the Second Pass on the entire brain or all of the sections of interest. |
* Reference section: Choose the reference section that is closest to the center of the brain.
Linear transformation: Applies a uniform set of transformation parameters to the entire section. We recommend trying linear transformation first and evaluating the results.Nonlinear transformation: Applies a transform that is non-uniform across the section. Nonlinear transformation can improve the registration of a section in some cases; we recommend trying it if the results of linear transformation do not meet your expectations.

|
|
Transforms: View a list of sections that have been registered and manage the resulting transforms. Use the Transforms controls to designate transforms as reference sections for registration of other sections, quickly jump to a section in the Experiment Slice pane of the display, and delete transforms that you want to remove from your results. (This tool is in both the Single and Serial Sections set of tools; see above for details). |

|
Landmarks Not available yet, but coming soon: Tools for marking structures of interest (fiducial points) in your images to direct their registration to the atlas. |