Registration windows and tools reference
Context
Learn about the tools and software layout for registering brain images to reference-brain atlases

|
When you click Register Sections or Register Volume on the Registration ribbon, tools for aligning your image(s) with a reference-brain atlas are displayed. You'll see the following:
|

|
 Other tools will be displayed on the
 See instructions for Register sections and Register volume.
Main viewing window
Default Full View
|
|
In Registration mode, the default view in the main NeuroInfo window shows a set of four panels:
|

Experimental Slice View
|
|
Click Experimental Slice View to display only the Experiment Slice view in the main NeuroInfo window. This corresponds to the top right image in the Default Full View.
|

 Click Default Full View to return to the view showing all four panels as described above.
Navigating images
-
The location of the cursor in either Slice panel (i.e., Experiment Slice or Atlas Slice) is represented as a yellow ball in the 3D panels on the left.
-
Hover the mouse on a panel to make it active; the panel label (e.g., Experiment slice for the top right panel) is highlighted in bright green to indicate that the panel is active.
-
Move the slice display using the 3D Slice Scroll tool located on the right side of the NeuroInfo window. Note that you can move the tool if desired; it is a dockable window.
-
Alternatively, you can move the slice display using the Orthoview tool. Open it from the Workspace ribbon.
-
Zoom in or out in the active panel by scrolling your mouse wheel.
-
Change the orientation of the 3D visualizations (experimental and atlas) or return to the original orientation using the Orientation buttons in the registration ribbon:
Registration panel overview
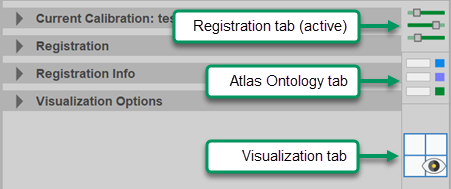
The Register sections to atlas and Register volume to atlas panels (dockable windows) include three tabs, each containing a different group of related registration tools (see image on the right). Click the tab to view its contents.
 Registration
Tools to select the reference-brain atlas that you want to use and to register (align) your brain images to the reference atlas are organized in sections; click the drop-down indicators to expand each section. The specific
Current Calibration: , , or the calibration that specifies the reference-brain atlas you're using for the registration, specimen orientation and scaling information.
Once you have activated the calibration for your registration, you may want to collapse this section.
Registration: Tools and controls for automatically registering (aligning) your brain images to a reference brain atlas. The tools displayed depend on whether you want to register sections or register a volume.
Registration Info: Enter image information and view quantitative registration information.
Image Info:
-
Modality: Verify or change the microscopy mode for the experimental specimen.
-
Channel: Verify or change the color channel that contains the cytoarchitectural information needed for the registration process.
Registration Info: Diagnostic information about your registration (alignment).
Visualization Options: Controls for viewing and hiding the atlas overlay in the Experimental slice view, anatomic regions defined in the atlas, and tracing data in image files.
-
Show atlas over experiment slice: Toggle display of the current atlas slice superimposed on the experiment slice on and off (top-right pane of the main NeuroInfo window)
Transparency: Adjust the transparency of the atlas image (available when the box above is checked).
-
Show anatomic regions: Toggle display of selected anatomic regions on and off. When checked, anatomic regions are displayed in the two bottom panels that represent the atlas and in the experiment slice pane (top-right).
Transparency: Adjust the transparency of anatomic regions
-
Show Slice Indicator in the Atlas and Experimental View: In the 3D views on the left (Experiment and Atlas), toggle display of the red line that indicates the current slice shown in slice-view panels on the right (Experiment Slice and Atlas Slice).
This may be of interest for creating figures to share your results.
-
Synch cameras between Experiment and Atlas Slice view: Check the box to synchronize the display of the slice-view panels on the right (Experiment Slice and Atlas Slice). For example, if you zoom in on the Experiment Slice view, the Atlas Slice view will zoom in as well.
-
Clip Tracings: Restrict display of modeled structures in images, such as detected-cell markers, brain-region contours, or cell structures modeled in other MBF Bioscience software, to a portion of the experimental image.
Thickness: Use the Thickness slider to indicate the z depth for display of traced structures: thinner to the left, thicker to the right.
 Click Hide Tracings in the Registration ribbon to toggle the display of all traced objects on and off.
 Atlas Ontology
Atlas ontology tools to view and display all of the anatomic structures and regions that are defined in the brain atlas chosen for the registration. You can also create and edit groups of structures and regions that are pertinent for your research.
 Visualization
Visualization controls for the 3-dimensional display of experimental images and any modeled structures.
Registration ribbon—in registration mode
When you click Register Sections or Register Volume, you enter registration mode, and the Registration ribbon at the top of the screen changes to display tools specific for brain-atlas registration. Functions of the tools are described below:

|
Transform Files |
|
|
|
Registration Transforms: Use the drop-down menu to access tools for loading and saving "Transforms". Note that saving your data file from within the registration tool saves the transform or transform set so that it will be reloaded when you re-open the data file. Transform: A transform maps geometric points from one physical coordinate space into another. NeuroInfo creates one or more transforms as the result of registering a brain image or series of brain-section images to a brain atlas. Transforms record the alterations in the size, shape, and/or sectioning angle of the reference atlas needed to register (align) the experimental brain image to the atlas. Transform Set: a collection of transforms, one for each section in a serial section registration. Transform Sets are not relevant for image-volume registration. When registering multiple sections, save sets of transforms in separate folders to avoid overwriting or mixing results from different animals or registration attempts.
|
|
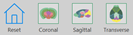
Orientation |
|

|
Reset: Return to the original image orientation. |
|
|
Coronal: View coronal orientation. |
|
|
Sagittal: View the sagittal orientation. |
|
|
Transverse: View the transverse orientation. |
|
Display |
|
|
|
Experimental Slice View: Display only the Experiment Slice view in the main NeuroInfo window |
|
|
Default Full View: A set of four image panels, with3D visualizations on the left side and slice views on the right. The top two images are the experimental sample and the bottom panel are the selected brain atlas |
|
|
Hide Tracing: Hide tracing data, such as markers and contours. |
|
Mapping |
|
|
|
Select Anatomy: When enabled, click in the Experiment- or Atlas-Slice views to select and view the structure that is defined in the brain atlas at the location. |
|
|
Deselect Anatomy: Click to deselect and stop viewing brain structures defined in the atlas. |
|
|
Map Experiment to Atlas: Map experimental data (markers and 2D contours) into the common reference space of the brain atlas used for the registration. |
|
|
Map Atlas to Experiment: Map selected brain anatomic regions from the atlas onto the experiment. |
|
|
Analysis: Display quantitative information about the brain regions identified in your images. |
|
Publish |
|
|
|
Snapshot Adjust the view as needed, then click Snapshot to capture a screen shot of what is currently displayed in the main software window, including atlas and experimental views and overlays. The Save As window opens; provide a filename for the snapshot and the desired location for the file. |
|
Exit |
|
|
|
Leave Registration: Exit registration mode; the buttons on the ribbon will change back to tools that are not part of the image registration process and the Register to Atlas panel of tools on the right closes. |


