Auto-calibration
Purpose
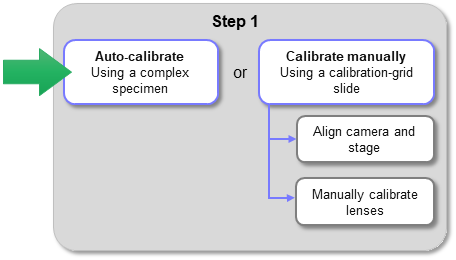
Auto-calibrating your microscope lenses enables your Neurolucida system to accurately measure structures in your specimens by determining the µm to pixel ratio for each lens. The auto-calibration process also adjusts stage movements to keep the camera and stage precisely aligned.
How it works
Auto-calibration uses registration (i.e., optimal alignment) of acquired images at known stage positions to accurately determine the scale factor and aspect ratio of the microscope objective and assign it to the associated software lens.
See also Calibration overview.
Material needed
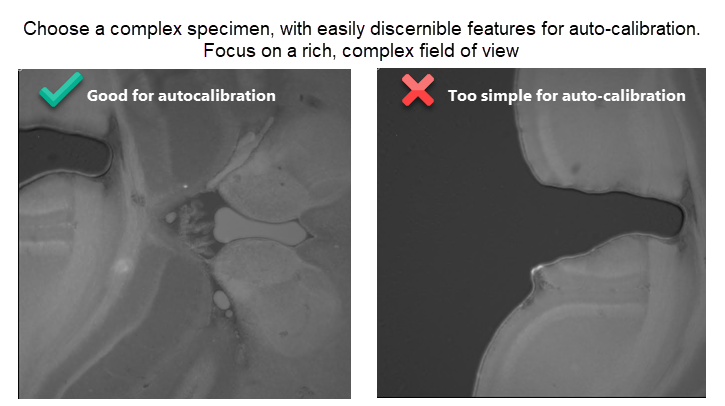
Unlike manual lens calibration, which uses a calibration-grid slide, auto-calibration requires a non-uniform specimen with distinct features to work properly; the more complex, the better. Click the thumbnail to expand the image and view example fields-of-view that do and do not work well for auto-calibration.
Auto-calibration procedure
-
Place a specimen with distinctive, unique features on the microscope. Click to set the reference point if you haven't already done so.
Navigate to a complex region of the specimen and bring it into focus.
-
Go to File > Calibration and click one of the following buttons:
-
 Auto-calibration: choose if the software lens already exists.
 -
 New Lens: choose if the lens has not been created in the software yet.
 In the Create New Lens window that opens:
-
Enter a name for the lens, add comments, and choose units.
-
Select Camera or Image as the Lens category.
-
Choose the lens medium or enter a Z-correction factor.
-
Select Auto-calibration for the Calibration Type.
-
-
-
The Select Lenses for Calibration window opens. The software lenses currently on the system are listed. To start the auto-calibration:
-
Type in the magnification value (e.g., 5 for a 5x lens) for each lens that you want to auto-calibrate.
If you do not enter a value for a lens, it will not be auto-calibrated.
-
Click OK.
-
-
The Auto-calibration window opens and lists the lens(es) that will be calibrated.
-
Click Continue to proceed or Cancel to select additional/different lenses for calibration.
-
Follow any instructions that appear onscreen.
-
The Auto-calibration window displays the current operation while the process runs.
-
-
When the auto-calibration process finishes, a message window is displayed indicating:
-
Auto-calibration completed. The calibrated lens name(s) is listed, followed by the lens scaling (µm/pixel) in X and Y, and the angle of camera rotation in degrees.
-
Auto-calibration did not complete for one or more of the lenses. This can happen for the following reasons:
-
The field of view is not suitable for auto-calibration; a "Failure to calibrate lens" message will be displayed. Move to a different region of the specimen or use a different specimen. Auto-calibration requires a complex field of view with distinctive features, and good contrast.
-
The camera is not sufficiently aligned with the stage. If the angle of camera rotation with respect to the stage is too high, auto-calibration will fail and a "Significant camera-stage misalignment" message will be displayed that includes the degrees of misalignment detected. Follow the instructions to adjust camera-stage alignment, then repeat the auto-calibration.
-
-
-
Click ok to close the window.
Next Steps
Perform parcentric/parfocal alignment