Nucleator
Purpose

Use the Nucleator probe to estimate particle (e.g., cell) volume with isotropic or vertical sections.
Requirements
Before using this probe, you need to obtain a systematic random sample of particles; use the to choose particles for evaluation. This way, each particle has the same probability of being selected regardless of the shape, orientation, or size. If particles are not chosen in an unbiased manner, the mean of their estimated volumes cannot be unbiased.
- Use one criterion for particle selection for the optical fractionator, for instance choose the nucleus top to select cells.
- Once a particle or cell is selected, focus to an arbitrary point near its center for the nucleator-probe analysis.
Procedure
-
 Start the Optical Fractionator workflow (from the Number section of the Probes ribbon) and work through the steps up to the Count objects step.
 - At the Count objects step, click the Start Counting button in the workflow and identify the first particle, but do not click on it.
-
Click the Nucleator button from the Volume/Area section of the Probes ribbon.
In the Nucleator Parameters window that opens, select a section orientation (vertical or isotropic) and enter the number of rays desired. For efficiency, we recommend using either 2 or 4 rays: 2 rays are oriented in opposite directions; 4 rays form 2 lines that cross.
-
Click a marker type that you will use to mark particles, then click the unique point of your choice within the particle or cell. The rays are shown extending out from the central point.
For vertical sections only:
-
Right-click and select Define vertical axis.
-
Drag the arrowhead to define the axis.
-
- Click the location where each of these rays intersects the boundary of the particle.
- If a ray crosses the boundary multiple times, click each intersection. The program places tick marks at each boundary.
- To delete a tick mark, right-click over the tick mark and select Delete?.
- When finished marking the boundaries of the current particle, right-click and select Finish Current Nucleator.
- Click the next particle to be sampled in the counting frame and repeat steps 4–6.
- When you have finished sampling particles in the counting frame, right-click and select Next Scan Site to move to the next sampling site and repeat steps 4–7.
- When have finished marking all the particles of interest, right-click and select Finish Current Nucleator and Exit.
- To view results, use Probe Run List.
Multiple nucleator
If you place more than one tick mark per ray, you will obtain information about the areas contained with each tick mark.
Example: Three areas are marked. 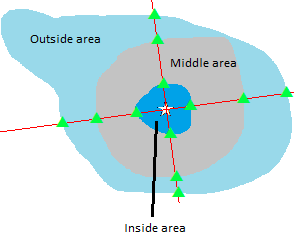
If you place two markers per ray, you will obtain the same results for the middle and inside areas. Because of this, we recommend that you use only the information for the outside and middle areas.