9. Count objects
Procedure
The workflow displays a list of the sections and contours that were drawn for each section. Follow this procedure:
-
Click the name of a contour to select it.
-
(Optional) Sampling: Confirm the sampling parameters to be used.
-
Click Start counting. The workflow displays new options for counting.
-
The stage moves to the first counting site and, if you selected Refocus to top of section at each grid site in the 5. Measure mounted thickness step, the Focus Top Of Section window is displayed.
- Focus above the top of the tissue until it is completely out of focus.
- Slowly focus back down onto the tissue until something on the tissue (e.g., a cell or interstitial components) comes into focus; this is the top of the section.
- Click OK.
-
The Focus Bottom Of Section window is displayed.
-
Focus all the way down through and past the bottom of the tissue until it is completely out of focus.
-
Slowly focus back up until something just comes into focus. This is the bottom of the tissue (use the Z-meter to help you determine the direction that you are focusing.
-
Click OK.
Determining what point is the top and what point is the bottom of the tissue varies from one researcher to another.
This is not an issue as long as you are the only person counting a particular experiment and you are consistent in your criteria -
-
-
Start counting in the first site.
-
Select a marker from the Use Marker drop-down menu in the workflow.
-
Focus down until a small circle is visible in the center of the field of view. If the grid spacing is small, multiple circles may be visible. Mark only the circle in the center, as the other sites will be systematically visited.
-
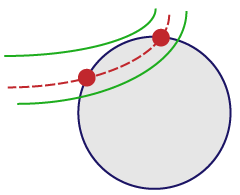
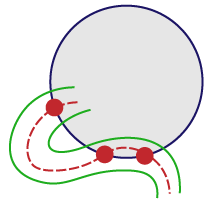
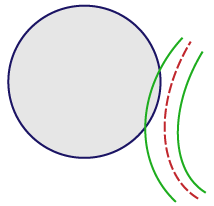
Place a marker at each location where a fiber crosses the currently visible circle (shown as green in the Z meter) if the transection is within the disector height/sphere radius .
If this point of a fiber comes into focus while in the guard zone (shown as red in the Z meter), don't count it (Disector height and guard zones ).
-
Focus through the section, marking each intersection between a fiber and the sphere, until all intersections have been counted; the circle will appear larger in each subsequent focal plane to represent the sphere or hemisphere.
If you are using hemispheres and the current focal plane is near the equator of a hemisphere, the marker is counted as 1/2 (see Markers counted as half counts under Sampling results).
-
Repeat steps c-d for the other transection that can be counted in the site.
-
Once you've identified all the objects in the site, click the next button in the workflow to move to the next counting site.
-
-
Once you have visited all the sites, the probe run is displayed under Regions of Interest .

Data is automatically saved at the completion of each probe run. If the data file is not named, Stereo Investigatorprompts you to name and save the file by opening the Save As window.
-
Select the next section: Click Add new section if a new section needs to be added, or Begin Next Section.
-
The workflow redirects you to a previous step.
-
The program verifies that you have the correct slide on the microscope to sample, and alerts you that it is redirecting you to the beginning of the workflow.
-
Some steps are disabled since the same parameters must be used for all sections in a given region.
-
-
Follow the workflow down to the Count Objects step again.
-
Continue counting in each section and adding new sections until you have completed all the sections in this particular specimen.
-
Click I've Finished Counting.
Edge cases
For vessels that appear on the edge of the spaceball, use the “center line” rule:
-
If the center line enters and then leaves the probe, mark it twice (at the entrance point and at the exit point).
-
If the center line weaves in and out, mark the centerline every time it enters or leaves the spaceball.
-
If the center line doesn't enter the spaceball, don’t mark it.
One data file = one specimen
- DO NOT save each section as a new file.
- Use the workflow to add new sections until you've traced and counted all the sections in an animal; this allows you to save these sections as one file, allowing you to view the total length estimate for the entire structure, not just one section of the structure.