Calibration overview
Purpose
A properly calibrated microscope system is essential for obtaining accurate quantitative data and creating high-quality 3D image reconstructions. Calibration defines the relationship between micron distances in your specimen and the number of pixels displayed onscreen. The calibration process helps ensure that the camera, microscope lens(es), and stage are aligned for optimal performance and that measurements obtained using the system are accurate.
Commonly used calibration tools include the following (find them by going to File > Calibration):

|
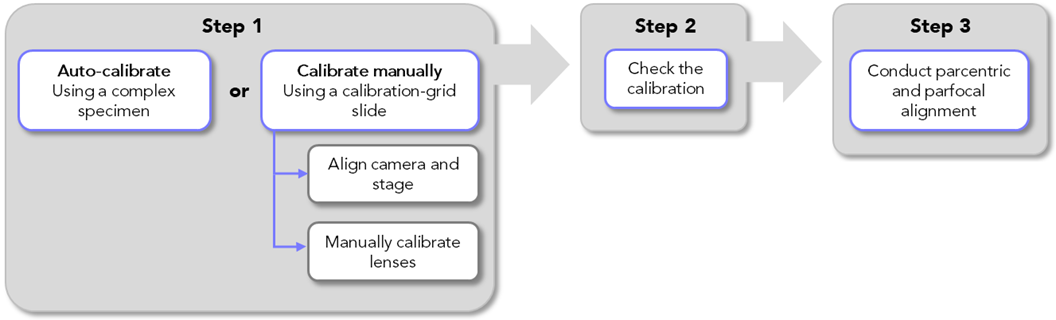
Auto-calibration: Automatically calibrate lenses using a non-uniform specimen with distinct features |

|
Edit Lens: Edit or delete an existing microscope lens |

|
New Lens: Create a new software lens |

|
Parcentric Parfocal: Conduct parcentric and parfocal calibration |

|
Recalibrate Lens: Manually calibrate (grid tune) lenses using a calibration-grid slide or an image of a calibration grid slide |
When to calibrate
We recommend calibrating your microscope system:
-
Following a regular schedule; many laboratories and core facilities establish schedules for microscope-system calibration.
-
After moving or inadvertently jostling the microscope.
-
After installing or removing microscope hardware. (For new lenses, you must create a software lens in order to calibrate it; see Creating a lens.)
-
If slide scans show misalignment of individual image tiles.
Overview of the calibration process
(click on a step in the image to jump to the instructions)
Also see Creating a lens, Calibration Panel
Before you start
- Turn on the microscope system, including the computer.
- Start Stereo Investigator software.
- If applicable, add and/or remove objectives to and from the microscope and create software lenses for new objectives.
- Tighten installed objective(s) by hand.
- If you have moved or changed your camera, make sure that it is securely attached to the c-mount that attaches it to the microscope. Hold your camera with one hand and the c-mount with the other, and gently rotate the camera clockwise. For camera-stage alignment, you will rotate the camera and camera mount together as a single unit.
