Virtual Tissue (slide scanning): Tracing the region of interest
Now that your workspace is ready, the second step is to trace the regions that you wish to acquire with Virtual Tissue. The procedure is described below.
![]() Are you using Fluorescence? Set up the Device Command Sequences before you start tracing.
Are you using Fluorescence? Set up the Device Command Sequences before you start tracing.
- Select the objective that will be used for the acquisition and verify that the matching lens is selected in the software.
- Adjust the light on the microscope so that it is comfortable to look at the slide through the oculars.
- Live Image mode is on (Acquisition>Live Image is checked).
- Load the slide onto the stage and bring the slide into focus at a low magnification (2X or 5X).
- Using the joystick, bring the desired location into view.
- Use Joy Track to maintain registration between stage movements and your contours.
- To begin tracing, right-click and select End Joystick Mode.
- Begin tracing a contour around the first region of interest on the slide, staying close to the tissue. Tracing contours
- Continue tracing contours around all the sections to be acquired.
- Trace around the entire brain section (or even multiple brain sections) or around a single structure in the brain.
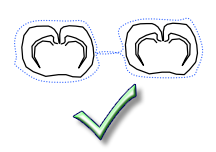
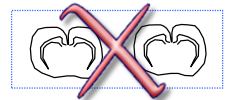
 Virtual Tissue creates an image file for each region delineated by a contour. To obtain an individual image for each section, trace a contour around each section.
- Keeping the contour close to the tissue will reduce acquisition time and make it easier to place focus points.


- When finished tracing, right-click and select Close Contour (Virtual Tissue doesn't recognize open contours as regions of interest to be acquired).
 Camera settings for Virtual Tissue