Enable Illumination Correction
Turn on Enable Illumination Correction before acquisition if you are unable to use a background correction with an actual background image.
Note that:
- Illumination correction is designed for fluorescent images -- applying this command to other types of images is likely to yield poor results.
- This command is CPU-intensive.
- It may noticeably increase the exposure of the sample to light. We recommend processing images with easily bleachable dyes after acquisition as well as 3D single-plane acquisition.
![]() Before applying to a virtual tissue, we recommend that you experiment with different settings on a test tissue.
Before applying to a virtual tissue, we recommend that you experiment with different settings on a test tissue.
Using Illumination Correction
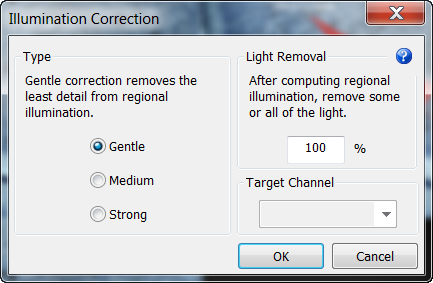
- Before acquiring an image, click Acquisition>Enable Illumination Correction. Neurolucida displays the Illumination Correction dialog box
 .
.- Type: Start with Gentle.
- Light Removal: Start with 50%.
- Target Channel: Disabled (available for acquired images). Image Illumination Correction
- Click OK and perform the acquisition.
- Examine the acquired image. If you are not satisfied with the results:
- Click Acquisition>Enable Illumination Correction again. Neurolucida disables the command.
- Click Image>Live Image to return to the live image.
- Click Acquisition>Enable Illumination Correction again to select different settings.
- Perform the acquisition.
How it works
In the absence of a background image, Neurolucida uses the image to estimate illumination variance for background correction.
![]() Also see Enable Background Correction, or Image Illumination Correction for acquired images.
Also see Enable Background Correction, or Image Illumination Correction for acquired images.