Placing spines
Before you start
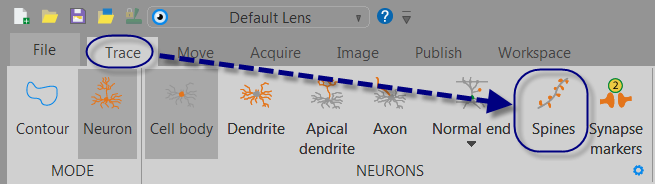
- Before placing a spine, click Spines from Trace>Neurons>Spines (make sure that Neuron mode is selected) and select a spine type from the bar.

- For live-camera images: We recommend that you trace the tree(s) and place the spines associated with the tree(s) during the same session.
If you traced the tree during a previous session: Be aware that as you re-open the software, you may place the reference point at a slightly different Z position. As a result, spine length data may not be valid. To avoid this issue, re-align your tracing in Z (before placing spines) by using the Joy Free mode and the Z filter in the Orthogonal View.
Although the spine types are represented by different shapes in the toolbar, each spine placed manually is represented as a sphere regardless of the spine type selected.
Placing spines manually
There are three methods to place spines manually: Two-click & single-click methods (for which you need to trace the dendrite before placing spines) and spine-to-tracing method (for which you can place spines while tracing):
- The dendrite is already traced.
- Select a spine type from the Spines toolbar.
- Optional: Adjust the size of the spine head by scrolling the mouse wheel. If mouse wheel focus is enabled, hold down CTRL and scroll the mouse wheel.
- Click to place the spine head center.
- Move your cursor over the traced dendrite; a rubber line appears.
- Click and release the mouse; the spine is placed.
- Click the spine icon again to disable the Spines mode and return to tracing.
- The dendrite is already traced.
- Select a spine type from the Spines toolbar.
- Right-click and select Spine Settings.
- Under Anchor Points, check the Use closest branch point (single click mode) box.
- Optional: Adjust the size of the spine head by scrolling the mouse wheel. If mouse wheel focus is enabled, hold down CTRL and scroll the mouse wheel.
- Click to place the spine head center; the spine's neck is placed on the closest branch point.
- Click the spine icon again to disable the Spines mode and return to tracing.
- Select a spine type from the Spines toolbar.
- Right-click and select Spine Settings.
- Make sure that One-shot spine placement (only while tracing) is selected.
- Optional: Adjust the size of the spine head by scrolling the mouse wheel. If mouse wheel focus is enabled, hold down CTRL and scroll the mouse wheel.
- Use the two-click or the single-click method to place one spine. The program automatically returns to the tracing mode.
To perform a quantitative analysis of the spines, use the Spines analysis available in Neurolucida Explorer.