Virtual Tissue (slide scanning): Fine-tuning calibration
Use this method if, upon acquiring a virtual slide, you notice a seam along the X or Y axis that is consistently occurring between image tiles.
- Place a small slide (5x5 or 10x10 slide created via the grid method) on the stage and use the objective that was used in the initial image.
- Find a distinct area in the seam in which you can clearly see the doubling.
- Zooming in to see the seam more clearly.
- Use a cell as a reference. If the edges of the cell are well defined, measuring will be easier.
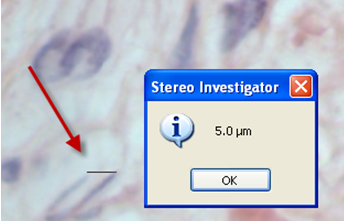
- Use Tools>Quick Measure Line to measure the doubling distance.
- Select a distinct point and click, then click that the point that appears as a double of the original distinct point.

- Your goal is to measure the distance you would like the tile to move in.
- A distance in microns is displayed. Write this number down.
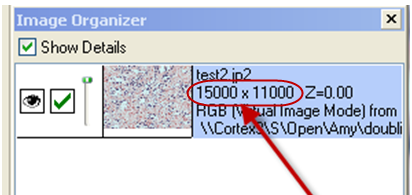
- Open the Image Organizer.
- Check the Show Details checkbox to display your camera resolution (X by Y)
 .
.
- Check the Show Details checkbox to display your camera resolution (X by Y)
- Follow these steps for the calculation:
- Divide the X value for the camera by the number of tiles in the x direction.
For a 10 x 10 image and the camera resolution is 15,000 x 11,000 → 15000/10=1500 pixels per tile
- Add your right and left pixel trim to the calculated pixel per tile value. This gives you the length of one camera image in pixels, your camera resolution of one image frame:
1500 + 50 + 50= 1600 pixels
- Divide your distance of doubling in microns by the calculated camera resolution:
x=(Distance in µm)/(Camera Resolution in pixels) → For a distance of 5µm, x=5.0µm/1600px=0.003125µm/px
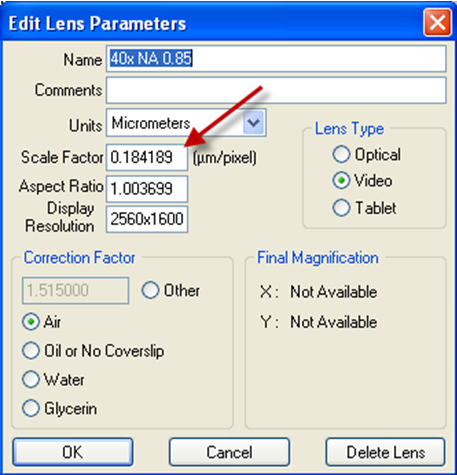
- Under Tools>Edit Lens, select the lens used to acquire the image.
- Add the "x" value calculated above to the scale factor in the Edit Lens window.

- Type the calculated number into the scale factor box and click OK.
x + scale factor → For a 40X lens, scale factor is 0.184189, thus type: 0.003125+0.184189=0.187314µm/px
- Test your fine-tuned calibration: acquire another small virtual slide and check for seams.
- The calibration may not work perfectly the first time, and a second calibration may be necessary.
- The most important part is measuring the distance of doubling accurately.
- If the calibration didn't work accurately enough, keep repeating the previous steps until no seam is visible.