About markers
A variety of marker types (i.e., circle shape, star shape, etc.) are available in the Markers toolbar in the main window
Placing markers
Placing Markers in the 3D environment
- Click the Markers button to display the Markers panel.

- Select a marker type from the list.
- Navigate as needed and click in the Tracing window to place markers over the neuronal structures.
Placing Markers in the main (2D) window
- Click a marker type in the Markers toolbar.
- Click in the Tracing window to place markers over the neuronal structures.
While you are in Markers mode, the tracing functionality is disabled. To return to tracing, click the marker type that is highlighted in the Markers toolbar; this will deselect the marker type and turn off the Markers mode.
Deleting markers
To delete the last marker placed, press CTRL-Z
To delete all markers of the same marker type, right-click over the marker type in the Markers toolbar and select Delete All Markers of This Type.
Editing markers
There are comprehensive marker-editing options in the main window (2D), note that there are also editing options available in the 3D environment.
See Editing markers (2D) and Placing and editing markers(3D)
Using markers for colocalization
Colocalization markers combine 2, 3, or 4 markers into one marker. Use these markers to label cells and structures that were prepared with two or more staining methods. See Colocalize markers for details.
Also see Colocalization analysis in Neurolucida Explorer for an alternative method.
Customizing the Markers toolbar
SPARC researchers can access anatomical terminology lists (or parcellation lists) compliant with FAIR data principles using SPARC vocabulary services. Once you have loaded SPARC terms for your image, you can use them to name markers as described here.
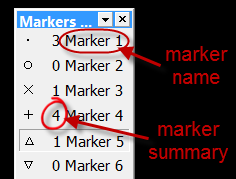
Marker summary: Number of markers placed for a given marker type. Right-click in the Markers toolbar and select Show Marker Summary.
Marker names: Right-click in the Markers toolbar and select Show Marker Names.
Right-click over the Markers toolbar and select Customize Markers Bar.
The marker becomes unavailable in the toolbar and markers that are already placed are hidden.
See Hidden Objects for information on hiding and revealing objects.
Go to File>Preferences>Tracing>Markers or use the right-click menu for changes to individual types.
Neurolucida 360 applies the change to all markers associated with that symbol, including the markers already placed.