Placing and editing markers(3D)
Placing markers on visible structures
- Select a marker type from the list.
- Navigate as needed and click in the Tracing window to place markers over the structures.
To delete the last marker you placed, press CTRL-Z.
Placing markers at locations without visible structures
Tracing and detecting structures in 3D relies on visible differences between the structure and the background. In order to place markers where there is no visible structure, display your image as an "Image slice", a 2-dimensional view.
-
 Click the image button to open the Change Image Display panel.
 - In the Display Image as section of the panel, click the radio button to select Image Slice mode.
- In Image Slice mode, position sliders for each of the three axes are displayed.
- Select the axis that you want to use (i.e., XY, XZ, or YZ) by clicking its checkbox.
- Position the image slice using the slider for the axis you chose.
- Select a marker type from the list.
- Navigate as needed and click in the Tracing window to place markers.
Editing markers
With the marker mode active, click the edit button to display the editing options.
To see all the options, select at least one marker.
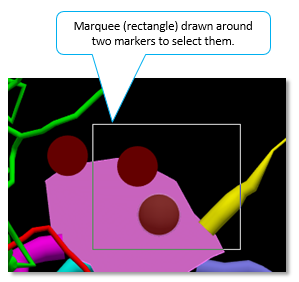
Selecting markers
- Click to select individual markers.
- Use the Select all button to select all your markers.
- To select multiple markers, drag the mouse to trace a marquee around them.

- Selected markers are displayed within a semi-transparent sphere.
Hide/unhide markers
- Hide markers that are selected by clicking the Hide Selected button.
- Hidden markers that are selected can be unhidden by clicking the Show Selected button
- Click Show All Hidden to make any hidden markers visible
Change marker display
Use the Show As drop-down menu to select how markers are displayed.
Modifying the marker type
Select a type from the Marker Type drop-down menu to modify selected markers.
Changing marker color
Select a color from the drop-down color picker menu to change the color of selected markers.
Change marker transparency
Use the slider to adjust the transparency of selected markers.
Changing marker names
There are multiple ways to change marker ways:
- Click the Change name button in the 3D environment and type in the new marker name.
- Go to File>Preferences>Tracing, Markers section and click the Customize button; double-click a name and type a new name.
- Right-click over a marker type in the Markers toolbar in the Main window and select Rename marker.
Deleting markers
Press the Delete key or use the Remove button in the Edit Markers panel. You can't undo this action.
Resizing markers
The minimal display size for a marker is 1 px.
- In Pixels:The size is fixed and the same for all markers; zooming in or out has no effect on the display size of the markers. This is the usual method for displaying markers.
- In Microns: The size of the markers is the same for all markers and is adjusted as you zoom. The markers are scaled along with the tracing.
- Intrinsic: The intrinsic size for each marker is defined by the diameter of the circular cursor when the marker was placed; therefore the intrinsic value cannot be modified in 3D. Since this size is defined in actual micrometers, the displayed size depends on the zoom level. If you zoom out, you may not see the markers since they are scaled as small as possible. The intrinsic setting allows you to define a different size for each marker.
See About markers and Editing markers (2D)