Detecting & editing somas (3D)
Before you start
- Open an image stack or single images.
- In the 3D environment, select your preferred image display (3D Volume [default] or Image Slice).
- Click the Soma button to display the Detect Somas panel.
Detecting & editing
Detecting somas
- Optional: Adjust the detection settings for interactive soma modeling.
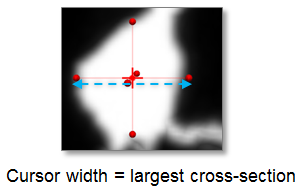
Define the Interactive search region. The cursor width represents the width of the search region.

Changing the value for Interactive search region:
Hold down CTRL and scroll the mouse wheel to change the cursor size and match the apparent largest cross-section of a soma.
OR
- Enter a value in the Interactive search region field.
- Constrain the soma size relative to the length of the region where soma and dendrites join by changing the value of Size constraint. After detection, you may notice that a detected soma appears to flow into the areas where the dendrites originate. To resolve this issue, increase the Size constraint value and detect the soma again.
- Optional: To associate somas with a specific color channel, select a single channel using either the Channel panel on the left side of the 3D environment window or the Image Adjustment tool (on the Image and Workspace ribbons) in the main window (2D).
- Click a soma to detect it or click the Detect All Somas button in the panel.
- If you are not satisfied with the detection, delete the soma by clicking the Clear button.
- Modify the detection settings and detect again.
- Increase the Soma detector sensitivity so that the detector takes into account areas with less contrast between foreground and background.
- Increase the Size constraint value to obtain less flow from the soma to the dendrites, and a more refined soma model.
Neurolucida 360 software may render somas with very complex structures as series of contours rather than as volumes.
Deleting somas
- Click the Edit button to display the Edit Somas panel.
- Click the detected soma to select it.
- Press the Delete key or click the Remove button.
Changing soma appearance
-
Click the Edit button to display the Edit Somas panel.
- If the somas were detected in a specific color channel, select that channel or All channels in order to edit the soma. (Select the color channel in either the Channel panel in the 3D environment or in the Image Adjustment tool in the main window (2D).)
- Select somas. Additional options become visible.
- To select all somas, click the Select All button.
- To select a single soma, click the soma in the tracing window.
- To select several somas, hold down CTRL and click each soma that you want to select.
- Modify color, color channel, transparency, smoothness, or texture.
Also see Tracing trees in User-guided mode(3D), Tracing trees in Smart manual mode (3D), Tracing trees in automatic mode (3D)