Detecting and editing puncta (3D)
Before you start
 In the 3D environment, click the puncta button to display the Detect Puncta panel.
Detecting puncta
Automatically detecting puncta
- Select the appropriate color channel for puncta in the Channel panel on the left side of the 3D window. Any puncta detected will be assigned to this color channel (unless you change the color channel).
- Choose Automatic as the Detection Method, then click the preview seeds button to preview puncta modeling using the current settings.
- Evaluate the results and, if desired, click Clear Seeds and adjust the puncta-detection settings to influence the modeling.
- Repeat steps 2 and 3 if needed to identify puncta-detection settings appropriate for your purpose.
-
When you are satisfied with the puncta detection preview:
-
Change the Detection Method to Machine Learning.
Machine learning employs specific models of object size and appearance that accept or reject locations in your image that meet general seed detection parameters. Only objects that meet the requirements of the specialized machine learning model are further considered for detection and segmentation, leading to more accurate selection of puncta of interest.
-
Click Detect All to detect with the new settings.
-
(optional) Check the Keep existing puncta box to detect additional puncta without losing the puncta already detected.
-
You can detect more puncta by adjusting the puncta-detection settings and/or selecting a different color channel. Check the Keep existing puncta box to retain the puncta already detected and either click Detect All again or manually detect individual puncta (see below).
Manually detecting individual puncta
- Select the appropriate color channel for puncta in the Channel panel on the left side of the 3D window. Any puncta detected will be assigned to this color channel.
- Click a punctum to detect it. The detected punctum is displayed with a color overlay.
If Neurolucida 360 software cannot detect a punctum, increasing the Detector sensitivity setting may help.
Editing puncta
In the 3D environment, click the puncta button to display the Detect puncta panel, then click Edit. 
Select the color channel used for puncta detection to access all puncta-editing options.
Selecting puncta to edit
There are three ways to select puncta for editing:
- Click the Select All button to select all detected puncta.
- Hold the Ctrl key on your keyboard and drag your mouse to select all puncta in the marquee (selection box) that forms.
- Click a single punctum with your mouse or hold the Ctrl key on your keyboard and click multiple puncta to select.
Splitting a punctum
To separate two puncta that are modeled as one due to physical proximity, use the Split button.
- Zoom, rotate, and pan as needed to view the punctum of interest clearly.
- Click to select the punctum you want to split.
- Click the Split button.
Merging puncta
To combine two puncta, use the Merge button.
- Zoom, rotate, and pan as needed to view the puncta of interest clearly.
- Hold the CTRL key on your keyboard and click the two puncta to be merged
OR press CTRL and drag the mouse to draw a marquee around the puncta to be merged. - Click the Merge button.
You can merge two puncta at a time. Repeat if necessary to merge more than two puncta into a single punctum.
Removing puncta
- Select the punctum/puncta.
- Click the Remove button or the Delete key on your keyboard. The selected punctum/puncta will be deleted.
You can click Ctrl-Z on your keyboard to un-delete the punctum/puncta.
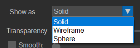
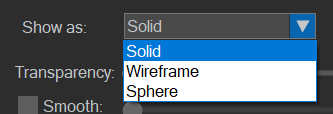
Changing puncta display
- Select the punctum/puncta.
- Select an option from the Show as drop-down menu.
Applying transparency, smoothness, or texture
These settings affect the appearance of puncta, but not the underlying data.
- Select the punctum/puncta.
- Transparency: Use the slider to adjust transparency of selected puncta in their assigned color channel or when all color channels are displayed. The transparency setting specified here will be ignored if a different color channel is displayed, however, the transparency of puncta and any other traced structures associated with undisplayed color channels can be controlled using the Trace Opacity slider in the Channel panel.
- Smooth: Check the box and drag the slider to enable or disable smoothing.
- Texture: Check the box and click Load Pattern, then navigate to the location of the textures you want to use and click Open to apply the texture to the selected puncta.
Puncta-detection panel settings and buttons
Detection Method
Choose either:
-
Automatic: Use automatic detection to quickly preview puncta detection so that you can evaluate the effects of modifying puncta-detection settings.
-
Machine Learning: We recommend using the machine-learning detection method to detect puncta once the settings have been established.
Detection settings
Type values into the boxes or use the arrows to incrementally increase/decrease the settings.
- detector diameter: Diameter in microns of potential punctum.
- detector Sensitivity: A lower value may result in fewer puncta detected; too high may result in erroneous puncta detection.
- Minimum size: Adjust to ignore objects that are too small to be considered puncta, e.g., background fluorescence/staining.
Detect Based on Proximity checkbox
- Check the box and click the Settings button to view and change Proximity Settings.
- Check the boxes next to the detected/modeled structures to be used as reference locations for proximity-based detection, (
- Maximum Distance: Maximum distance between the center of the potential punctum and the selected structures.
- Cancel: Changes are discarded and you return to the Detect puncta panel.
- OK: Your adjustments are saved and you return to the Detect puncta panel.
Keep existing puncta checkbox
Check the box to detect puncta without deleting puncta previously detected.
Filter image noise checkbox
If your image contains nonspecific staining and/or fluorescence, such as shot noise, check the box to minimize its effects on the analysis.
Buttons
- Preview Seeds: Click to display a preview of puncta modeling using the current puncta-detection settings.
- Detect All: Automatically detects puncta based on the settings defined in the Detection settings.
- Reset: Resets puncta-detection settings to their default values.
- Clear Last: Deletes the puncta detected in the previous detection instance.
Options
- Center after each manual detection checkbox: Check the box to automatically center the window at the last point clicked and avoid the need to pan manually while modeling puncta.