Editing spines (3D)
See tutorial: Detect, classify and edit spines (3D)
Before you start
- Spines have been detected (see Detecting and classifying spines (3D)).
- The Detect Spines panel is displayed in the 3D window. Click the Edit button to display the Edit Spines panel.

- If spines are associated with a single color-channel (that is, if a color channel was selected prior to spine detection), select that color channel to access all of the spine-editing functions. Select the color channel in either the Channel panel in the 3D environment or in the Image Adjustment tool in the main window (2D).

To exit spine-editing mode, click the Edit button.
Selecting, Hiding, and Showing Spines
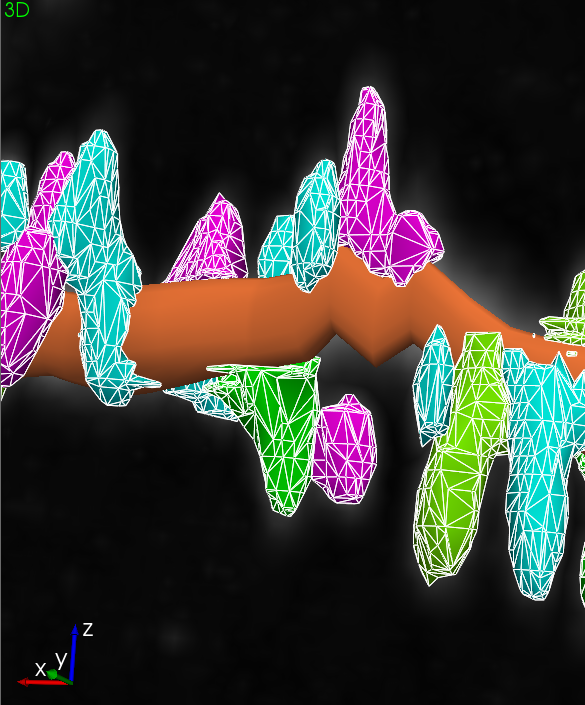
- Click the Select All button to select all detected spines. Selected spines are displayed with wireframes.

- Select individual spines by clicking on them.
- Select multiple spines by holding the Ctrl key and either clicking multiple spines or dragging with the mouse to select all spines in the marquee that appears.
- Click the Hide Selection button to hide all selected spines.
- Click Show All Hidden to show all hidden spines.
Editing
- Click a spine to select it. If you used automatic classification or manually classified a spine, its type is displayed in the Type drop-down menu.
- Select a different type from the Type drop-down menu in the panel. If you used automatic classification, the type you select overrides the type assigned by the program.
You can use the Spines toolbar in the main window (2D), not in 3D.
To combine two spines, use the Merge button.
- Hold the CTRL key and click the two spines to be merged OR press CTRL and drag the mouse to draw a marquee around two spines to be merged.
- Click the Merge button.
You can merge two spine objects at a time. Repeat as needed.
To separate two spines that are modeled as one spine due to physical proximity, use the Split button.
- Click the spine you want to split to select it.
- Click the Split button.
In most cases, the split location is unambiguous and one split operation will create two spines. You can, however, Split and Merge several times if needed to obtain a satisfactory model.
- Select spines to delete:
- Click the Select All button to select all the spines.
- To select a single spine, click a spine in the tracing window.
- To select neighboring spines, press CTRL and draw a marquee (rectangle) around the spines.
- Press the Delete key on your keyboard or click the Remove button to delete the selected spines.
Selected spines are displayed with a wireframe.
Appearance settings are displayed.
- Hold the CTRL key and click spines to select them or click the Select All button. Additional options are displayed in the Edit Spines panel.
- Click the arrow near the colored square to access the Color menu.
- Select a new color.
- Click a spine to select it.
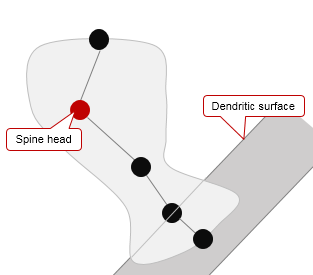
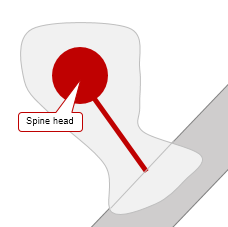
- In the panel, click the Points button. The spine is represented by five points.
- To change the spine head position, click and drag the point representing the head (second point from top of the spine). You may also move the two points representing the spine neck.

- Inspect the spines and verify their assignments to branches. Display spines as "Sticks" to make the inspection easier:
- Click Select All.
- From the Show as drop-down menu, select the Stick type. The sphere at the end of the stick represents the spine head.

- Click anywhere away from the spines to de-select the spines.
- Click the spine that is not assigned to the correct branch to select it.
- Click the points button; the spine is represented by five points.
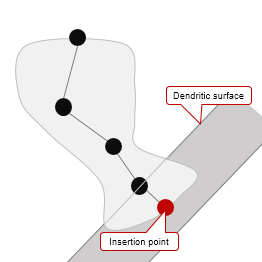
- Click the insertion point (first point starting from the dendrite) to select it then drag it to the centerline of the correct branch. Drag the other points as necessary to obtain a more accurate spine model.

Changing Spine Appearance
The color picker to the right of the Type menu can be used to change the color used to represent spines:
- Click a spine to select it, hold down CTRL and click several spines to select them, or click the Select All button to select all detected spines.
- Click the arrow near the colored square to access the Color picker.
- Select a new color.
The Show as drop-down menu offers choices for display of spines. It does not change the spine-type assigned.
- Click a spine to select it, click Select All to select all detected spines, or press and hold the Ctrl key to select multiple spines by either clicking them or dragging with the mouse to select all spines in the marquee that appears.
- Click the arrow next to the Show as drop-down menu and choose one of the display options.
Slide the Transparency slider to adjust the display of the selected spine or spines.
If you set transparency to 100% (far right of the slider), the spine(s) will become invisible and can only be selected using the Select All button—slide the transparency setting back and forth to make them visible again.
- Click a spine to select it, click Select All to select all detected spines, or press and hold the Ctrl key to select multiple spines by either clicking them or dragging with the mouse to select all spines in the marquee that appears.
- Click the checkbox next to Smooth and drag the slider to enable or disable smoothing.
- Click the checkbox next to Texture. Click Load Pattern and navigate to the location of the textures you want to use and click Open to apply the texture to the selected spine(s).
Reference: Dickstein, D.L., Dickstein, D.R., Janssen, W.G.M., Hof, P.R., Glaser, J.R., Rodriguez, A., O'Connor, N., Angstman, P., and Tappan, S.J. 2016. Automatic dendritic spine quantification from confocal data with Neurolucida 360. Curr. Protoc. Neurosci. 77:1.27.1-1.27.21. doi: 10.1002/cpns.16
Detecting and classifying spines (3D)Analyzing spines and synapses with Neurolucida Explorer