Define Counting Frame
Purpose

The Define Counting Frame tool enables you to define the XY size of the counting frame used with the Fractionator and Optical Fractionator probes.
Note that the counting frame disappears after it has been defined and is only displayed during the execution of probes that use it.
Defining the counting frame
 Click Define Counting Frame from the Tools section of the Probes ribbon.
Size the counting frame so that it contains a number of cells that you can comfortably mark without errors (i.e., without double counting or missing cells).
If the counting frame is not visible in your tracing window, it may be larger than the current field of view.
Changing a counting frame
Resizing the counting frame
Do one of the following to resize the counting frame:
- Enter new values for Size (side length for the square shape) or for X and Y (for the rectangle shape).
- Drag the sides of the frame with the mouse.
The counting frame dimensions are updated in the Define Counting Frame window.
Changing the shape between a square (default) and a rectangle
Do one of the following to change the counting frame shape:
- Place the mouse over the frame, right-click and select Force Square.
- Go to File>Preferences>Stereology Preferences>Counting Frame and uncheck Force Counting Frame to be Square.
Changing the colors of the counting frame
Do one of the following to change the counting frame colors:
- Place the mouse over the frame, right-click and select Change Left(Right) Colors.
- Go to File>Preferences>Stereology Preferences>Counting Frame.
There is no option to change the counting frame color in monochrome mode; the exclusion and inclusion lines of the counting frame are represented by white solid and dashed lines. 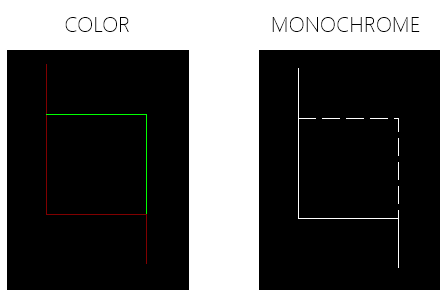
Moving the counting frame
Place the mouse over the frame. When the cursor changes to a four-headed arrow, drag the mouse to move the counting frame to a new location within the tracing window.
Right-click menu
Change Left Colors: Red by default, indicating the exclusion boundary. You can change this color if it is too difficult to see clearly.
Change Right Colors: Green by default, indicating the inclusion boundary. You can change this color if it is too difficult to see clearly.
Force Square: The counting frame will be constrained to be square, i.e. the horizontal and vertical dimensions will be equal, if this option is chosen.
Accept Count Frame: Accepts the current size and location of the counting frame.
Cancel: The definition of a new counting frame can be canceled using this option.