Parcentric/Parfocal calibration
Watch a video (YouTube 1:53), view the PDF
Overview
Parcentric and parfocal calibration compensate for the deviations from parfocality (focal plane) and parcentricity (collimation) that are normally encountered between different microscope objective lenses. They are both critical for maintaining proper position when changing magnification.
When switching between objectives:
- Parcentricity ensures that the same XY position is found.
- Parfocality ensures that the same location is brought to the correct Z depth (i.e., in focus).
Once you've calibrated the lenses, you're ready to perform the parcentric/parfocal calibration. Don't move the stage at any time; don't use oil with oil objectives.
Procedure
- Select the highest power objective and the corresponding software lens.
- Move the stage to display a corner of the small (25 µm) grid into the center of the screen.
- Click the File>Calibration>Parcentric Parfocal button.
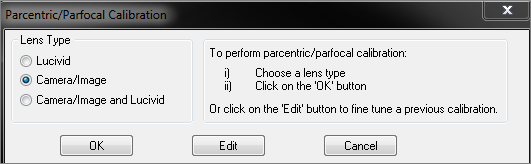
- In the Parcentric/Parfocal Calibration window, select Camera/Image under Lens Type.
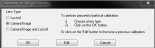
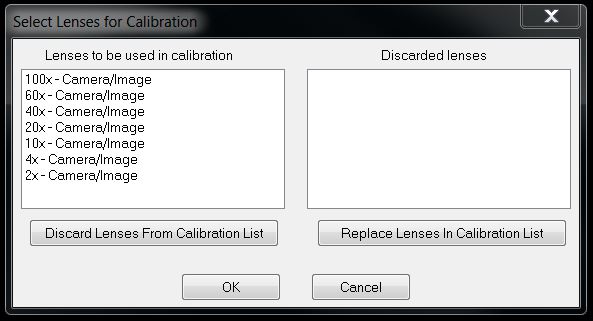
- In the Select Lenses for Calibration window, verify that the lenses are listed in descending order, from highest to lowest power.

- In the Parcentric/Parfocal Calibration window, select Camera/Image under Lens Type.
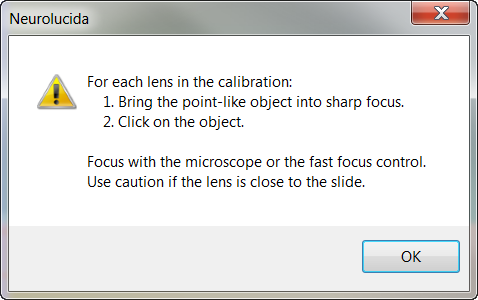
- An alert is displayed. This is a reminder that, for each lens, you need to click the EXACT SAME POINT on the grid, regardless of where it appears on the screen.

- Follow the prompt: Verify that the highest objective (called video lens here) is in position.
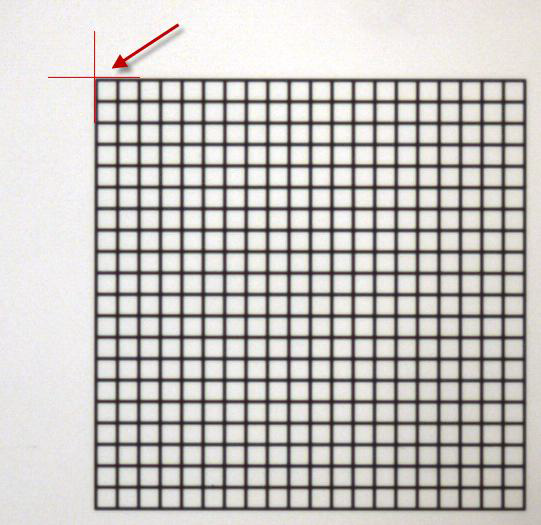
- Bring the top left corner of the grid into focus.
- Click the outer edge of the left corner of the grid.
Align the crosshairs of the cursor with the edges of the grid as precisely as possible. You'll use the same point with the other objectives.

- The program prompts you to switch to the next highest power objective.
Optional: Before switching objectives, adjust the light level on the microscope to see the grid clearly enough.
When you switch objectives on the microscope, the program automatically selects the corresponding software lens.
 The grid is not displaying properly. What can I do?
Check whether Fit Video in Window (File>Hardware setup>Camera>Settings panel) is selected.
When should you select this option?When the video resolution is higher than your monitor resolution, and only the top left of the video is visible in the tracing window. Select Fit video in Window to reduce the size of the video so that the entire video is visible within the tracing window.
When should you disable this option?When the video resolution is lower than your monitor resolution, and the entire video is displayed in the top left of the tracing window with black regions bordering the bottom and right of the video. When enabled, Fit Video in Window will attempt to fill the tracing window with the video by stretching the video. make sure to uncheck the box.
- Bring the top left corner of the grid into focus.
- Click the outer edge of the left corner of the grid.
- Repeat step 9-11 for the remaining objectives.
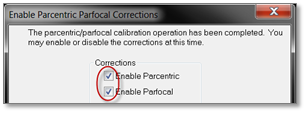
Once all lenses have been calibrated, the Enable Parcentric Parfocal Corrections window appears.
- If your microscope has an external Z motor (a black plastic cylinder over one focus knob), both Enable parcentric correction and Enable parfocal correction must be selected.

- If your microscope has an internal Z motor, only check Enable parcentric correction; Enable parfocal correction should not be selected. This is because parfocal correction is controlled via the microscope itself. Refer to your microscope manual for more information on adjusting parfocality. On a Zeiss microscope, use the touch screen to access Home>Configuration>Focus>Parfocality Adjustment.
- If your microscope has an external Z motor (a black plastic cylinder over one focus knob), both Enable parcentric correction and Enable parfocal correction must be selected.
- Follow the procedure for Checking calibration accuracy.