AutoNeuron Step 2: Region of interest
Option 1: Trace the entire image
- Leave the Trace entire image checkbox checked.
AutoNeuron works with the entire image, including areas off-screen (this is the default).
Option 2: Trace a region of interest 
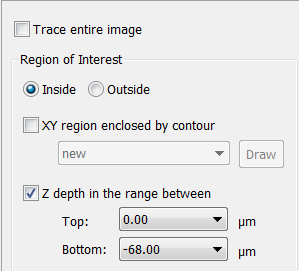
- Uncheck the Trace entire image checkbox; the Region of Interest panel is displayed.
- Choose whether to trace Inside or Outside a contour.
- Make sure you check the XY region enclosed by contour checkbox (if you leave the box unchecked, AutoNeuron will trace the entire image).
- Select an existing contour from the drop-down list OR
- Click Draw to trace a new contour.
- Enter a name and select a color in the New Contour for XY Region of Interest window.
- Trace a contour Tracing contours
- Click Done in the workflow window.
If you are working with an image stack, the Z-depth in the range between is enabled.
To limit the area to a range of planes
- Check the Z-depth in the range between checkbox.
- Select the top and bottom values from the drop-down lists.
![]() Limiting the area to a range of planes is useful when tracing a neuron that only crosses over a given range of planes within the entire image stack:
Limiting the area to a range of planes is useful when tracing a neuron that only crosses over a given range of planes within the entire image stack:
▶ AutoNeuron is less likely to pick up unwanted processes from other neurons.
▶ AutoNeuron will work faster as it will have less planes to process.